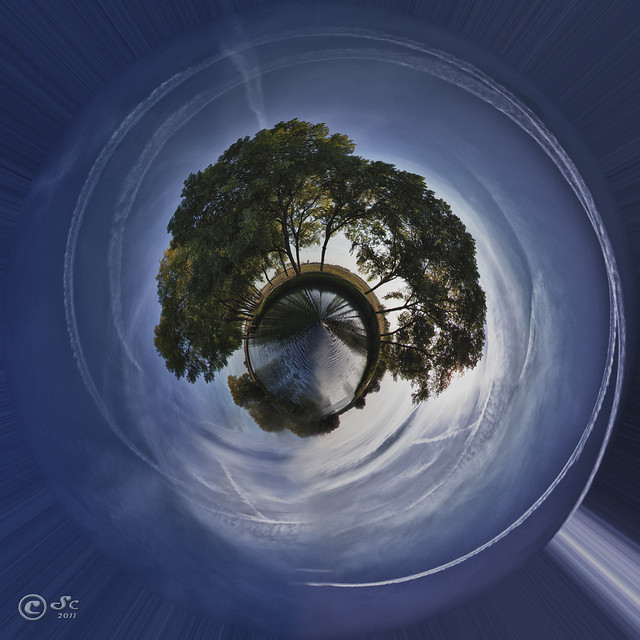
360' Panoramic View
File Formats
JPEG
JPEG stands for Joint Photographic Expert Group. It is the most popular and widely used format for viewing and sharing files. JPEG is where it compresses the images: This means that they are literally getting rid of some of the information forever, this is to reduce the size of image but in fact it makes the image have bad quality.
The biggest advantages of JPEG files is being convenient, they can be uploaded onto any website or presented on the internet as they only share a small amount of size.
TIFF
TIFF stands for Tagged Image File Format. It is a type of format that does not get rid of any information like JPEG, but it lets you save at the highest measurement of image quality.
TIFF is mainly used for commercial printing usages as it compatible with all programs, it is not used that much anymore it is only used by printing companies.. The files can be very large using TIFF compared to the small size of JPEG files.
RAW
A raw file is like a negative, you can develop it according to each of your individual needs and the features you want specifically in the photograph. If you want to edit onto the photograph in photoshop or another program the best way you do this is using a RAW file, this allows you to edit over and over again.
I personally use this format when photographing on my digital SLR, shooting on RAW means that you get both JPEG and the original RAW file to work with.
Initial Ideas
For this project I had the idea of photographing like the video below, it gave me inspiration as i wanted to create unusual angles and surreal shapes. Finding this helped me as creating 'little planets' as they call it uses all these techniques and creates them into one image.
I am particularly inspired by the work of .....as he takes panoramic images in the countryside, but not only pure natural beauty within the frame you are drawn to trying to spot the unusual and industrial figures hidden e.g Electrical Wires. I am going to take on this idea and photograph at old historical, architectural ruins/bildings. But to ruin this almost perfect landscape, I will purposely focus on the new inventions that are ruining our environments.
the video below is interesting as it presents to you images from other photographers, and the process of which you take to create these 'Little Planets'.
Examples Of Photographers Work:

I like the idea of placing a figure in the image to add to the mysterious and un-usual environment I want to create. And contrasting the beautiful, natural environment to the people that are beginning to destroy it.


This photo in particularly has inspired me to have an eye for intricate and different shapes, that would create a spiral of interesting features. e.g photographing a long bridge with tunnels and arches beneath would create an intriguing result because of the continuous curves bending and winding.

- Abstract
- Blurred
- Out Of Focus
- Symmetrical
- Curving Shapes
David Jackson
(http://www.telegraph.co.uk/culture/culturepicturegalleries/8622687/Mini-planets-3D-360-degree-stereographic-projections-by-David-Jackson.html)

Photographer David Jackson uses a technique called stereographic projection to turn landscapes and familiar landmarks into mini planets. Stereographic projection is a form of digital processing that shows a 360-degree spherical panorama as a flat image.
(Charing Cross Underground with Nelson's Column, London)

(Eastbourne Pier, East Sussex)
Alexandre Duret-Lutz
A French photographer, specializes in creating what he calls "Wee Planets"- this idea is unique, I have never come across something so different in photography it turns an almost boring and plain image into an outstanding, surreal creation. From watching the you-tube video on how to do this technique and researching photographers, I began experimenting with my own images: Specifically looking at the main natural aspects of the world: Sea, Rock, Vegetation.
A French photographer, specializes in creating what he calls "Wee Planets"- this idea is unique, I have never come across something so different in photography it turns an almost boring and plain image into an outstanding, surreal creation. From watching the you-tube video on how to do this technique and researching photographers, I began experimenting with my own images: Specifically looking at the main natural aspects of the world: Sea, Rock, Vegetation.


I particularly like the way Lutz has presented the photos in a grid form: this connotes the different sections and appearance of our world. Shooting different areas and environments but then placing them together to suggest one.
First Shoot


The Process Of 360'Panoramic

Once opened if the photo you have chosen has a lot of sky like the one I have chosen crop some of it out to create an even spiral around the centre of the image. Next I went to image, Image size, this was to make the image in a square shape. Change the width and height both to exactly 3000, click ok.


After re-sizing I went to Images, image rotation and rotate the photo 180 degrees.

To create the actual circular effect: I went to Filter, Distort, Polar Co-ordinates.

A small box appears, I made sure the rectangular to polar was selected and click ok: From this the 360* panoramic effect is created.

The outcome:

As the edges are not properly connected, I used the clone tool. This helped to remove and blend together the line in the photograph. By using the alt button to select the colour you want and then clicking on the part you want to change with this colour.

The final Image is revealed with a continuous spiral of colours from the sea-scape:

Final Prints
Rock,Forest,Sea


Final Outcome

No comments:
Post a Comment